
Installing a chain-link fence is one of the most cost-effective ways to secure your property, contain pets, or define your boundaries. While it often has an industrial reputation, a properly installed chain-link fence is remarkably durable, low-maintenance, and entirely achievable as a weekend DIY project.
By handling the installation yourself, you can save hundreds—if not thousands—in professional labor costs. This comprehensive guide walks you through every phase of the installation process, matching the depth and quality of top-ranking search results while addressing critical nuances like uneven terrain and tension wiring.
Phase 1: Planning, Permits, and Materials
Before driving a single stake into the ground, proper preparation ensures your project goes smoothly without municipal or structural hiccups.
1. Check Regulations and Utilities
- Property Lines: Verify your exact property boundaries. Never guess; building over a line can force you to tear down the entire fence.
- Call 811: Always call your local utility notification center at least a few days before digging to have underground lines marked for free.
- HOA & Permits: Check with your homeowners association or local building department regarding height restrictions, front-yard rules, and permit requirements.
2. Materials Checklist
- Terminal Posts: Corner, end, and gate posts (these are thicker and heavier than line posts).
- Line Posts: Intermediate posts placed along straight runs to support the top rail.
- Top Rails: Metal tubing sections that run horizontally along the top of the fence.
- Chain-Link Fabric: The wire mesh roll itself (choose your height and gauge, e.g., 9-gauge or 11-gauge).
- Hardware: Tension bars, tension bands, brace bands, post caps, loop caps, and aluminum wire ties.
- Concrete Mix & Gravel: Fast-setting concrete mix and crushed gravel for post footings.
3. Tools Needed
- Post-hole digger or power auger
- Mason’s string and wooden stakes
- Line level and post level
- Tape measure
- Pliers and heavy-duty wire cutters
- Fence stretcher/puller bar and ratchet strap
- Wrench set
Phase 2: Laying Out the Fence Line
A straight, accurate layout is the foundation of a professional-looking fence.
- Mark the Corners: Drive a wooden stake into the ground at each corner and terminal point of the proposed fence line.
- String the Layout: Tie mason’s string tightly between the stakes, keeping it a few inches off the ground to serve as your exact alignment guide.
- Plan Post Spacing: Measure the total run and calculate where your line posts will go. Line posts should be spaced evenly, typically no more than 10 feet apart. Mark their locations directly on the ground along the string line.
- Gate Clearances: If you are installing a gate, double-check your gate opening width measurements to ensure the hinges and latch hardware have exact clearance.
Phase 3: Digging and Setting the Posts
Terminal posts bear the weight and tension of the entire fence, meaning they require the most robust footings.
Dig the Holes: Dig terminal post holes roughly 24 to 30 inches deep (or deeper if you live in a region with a deep frost line). Line post holes can be slightly narrower (around 6–8 inches wide) and 24 inches deep.
Add a Gravel Base: Drop 2 to 3 inches of crushed gravel into the bottom of each hole for drainage to prevent post-bottom rot.
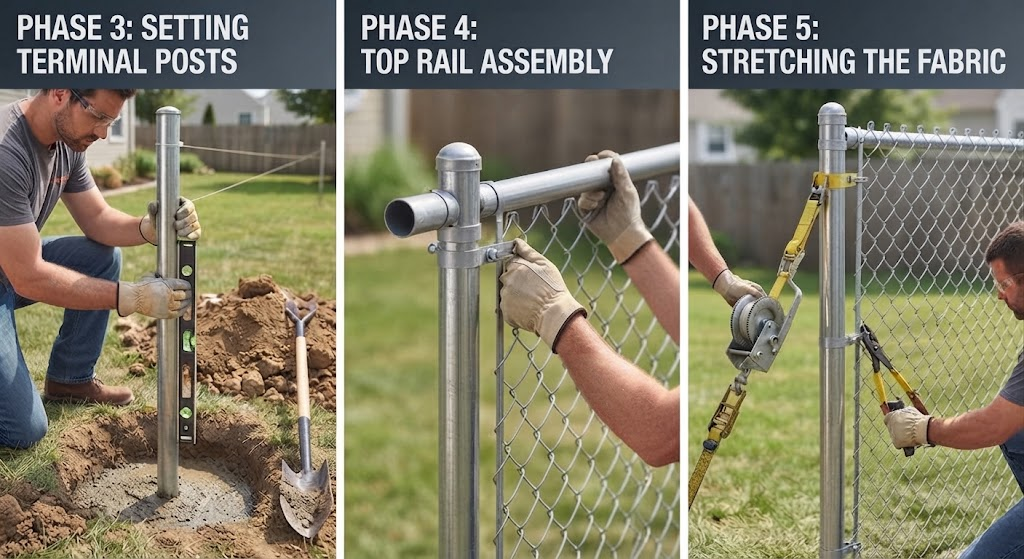
Set Terminal Posts: Insert the terminal post, check it with a post level to ensure it is perfectly plumb (vertical), and pour your mixed concrete into the hole up to a couple of inches below ground level. Tamp it down to eliminate air pockets.
Cure Time: Let the terminal post concrete cure for 24 to 48 hours before attempting to hang rails or apply tension. Once terminals are solid, you can set the intermediate line posts.
Phase 4: Installing Hardware and Top Rails
Once your posts are rock-solid, it is time to build the skeletal framework.
- Slide the Bands: Before capping your terminal posts, slide the required number of tension bands (used later to hold the mesh) and brace bands (used to secure the top rail ends) down the post.
- Attach Caps: Fit post caps onto the terminal posts and loop caps (which feature a hole for the top rail to slide through) onto the line posts.
- Install Top Rails: Slide the first length of top rail through the loop caps. Connect sections together using swaged ends or sleeve connectors. Secure the ends of the rail to the terminal posts using rail end cups bolted to the brace bands.
Phase 5: Hanging and Stretching the Chain-Link Fabric
This is the most critical step for achieving a clean, tight, professional look that won’t sag over time.
- Unroll the Mesh: Stand the roll of chain-link fabric upright near one terminal post and unroll it along the outside of the fence line.
- Insert the Tension Bar: Weave a metal tension bar vertically through the very end diamond mesh of the fabric.
- Attach to Terminal Post: Bolt the tension bar to the tension bands on your starting terminal post using carriage bolts.
- Stretch the Fabric: Walk to the opposite end of the run, pull the fence tight by hand, and insert a temporary tension bar into the mesh a few feet short of the end terminal post. Attach a fence puller (or a tractor/come-along winch setup) to the stretcher bar and pull the mesh until it is taut. You should only be able to depress the mesh slightly with firm hand pressure.
- Trim Excess Mesh: If the roll is too long, separate a single vertical strand of wire and “unscrew” it from top to bottom to cleanly detach the excess mesh.
- Secure and Tie: Connect the final tension bar to the destination terminal post’s tension bands. Finally, secure the mesh to the top rail and intermediate line posts using aluminum wire ties spaced every 12 to 24 inches.
Phase 6: Advanced & High-Value Sections
How to Install a Chain Link Fence on Uneven Ground
Slopes and dips present a challenge, as standard installation can leave large gaps at the bottom or cause the top rail to look jagged.
- The Sloped Method: For gentle slopes, follow the grade of the land. Racking the fence (tilting the diamond mesh parallelogram-style) allows the top rail to run parallel to the slope while keeping the fabric close to the ground.
- The Stepped Method: For steep changes in elevation, step your fence posts down vertically. You will need custom-cut shorter or longer sections of fabric for the vertical drop steps to ensure small pets cannot slip underneath.
How to Install Tension Wire on a Chain Link Fence
Adding a bottom (and optionally top) tension wire is a pro trick that drastically increases structural rigidity.
- Thread a heavy-gauge galvanized tension wire horizontally through the bottom loops of the chain-link diamond mesh.
- Pull the wire tight using a wire strainer or pliers and wrap/clamp it securely around the terminal posts.
- This prevents animals from pushing the bottom of the mesh outward and keeps the fence line completely straight.
How Much Does It Cost to Install a Chain Link Fence?
Understanding the financial picture helps contextualize your DIY savings:
- DIY Cost: Materials typically run between $10 to $20 per linear foot, depending on height, gauge thickness, and whether you choose galvanized or vinyl-coated green/black mesh.
- Professional Installation: Hiring a contractor typically ranges from $15 to $35+ per linear foot including labor. Doing it yourself cuts total project costs roughly in half.
Conclusion & Frequently Asked Questions
Installing a chain-link fence takes patience, muscle, and precision, but the structural reward is a clean, long-lasting boundary that stands strong for decades.
- How deep should chain link fence posts go? Terminal and gate posts should go down at least 24 to 30 inches into concrete. Line posts can be set at 24 inches.
- Do I need concrete for every post? Yes. While line posts can sometimes be driven directly into heavy clay soils in mild climates, pouring concrete footings for all posts—especially terminal posts—is essential to prevent shifting under fabric tension.